Showing posts with label paper. Show all posts

Tuesday, February 7, 2012

Foxy Valentine

Inspired by this valentine, and driven by my love of foxes, I set out to make my own version.

Well...it's not quite as cute. Thankfully, I don't think the recipient will be picky.

Sunday, September 11, 2011

Gone Fishing.

My 3 year old friend wanted to go fishing, so we quickly whipped up these little fellas in his favorite color. Tie yarn onto a stick and you're good to go!

Tuesday, May 3, 2011

Sunday, December 5, 2010

Clever Wrapping

My brother likes to buy cheap book at the thrift store. He then hollows them out and stores things inside. He gives me all of the pages. =)


I wrapped a shoebox with the pages, tied string around it, and added a crocheted snowflake. Easy and cute!

Saturday, February 27, 2010

Framed Art


Even simple drawings can be made to look more professional if placed in a simple frame.


This was given to me for Christmas, from Abigail.

Autumn

Friday, April 17, 2009

Scrapbook Store


In a recent trip to the city, we stopped at a nice scrapbooking store. Paper everywhere. 


It was loads of fun. 

What did we get paper for? A project for my wedding....=)

♥Autumn

Wednesday, December 3, 2008

Glitter Stamping


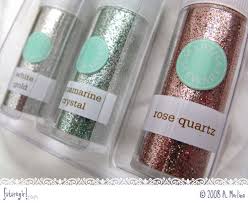
My little sister recently received Martha Stewart glitter stamps as a birthday gift. Here are my thoughts on the product:
The idea is really cool. Their is a pad that you spread some glue on. You choose some rubber stamps, and stick them onto a plastic block. Then you stamp the stamps in the glue pad, and press it onto your paper.

Shake the desired color of glitter onto the paper, and tap off. This leaves the design on your paper.

They work pretty well as long as you have enough glue on the pad.

But there are a few problems...the glue pad gets covered with glitter really quickly. And you have to add glue to the pad all the time. Also, the glitter comes out of the bottle really quickly. You have to shake the glitter onto a paper plate, and then dump it back into the bottle. But young kids CAN'T do this.
Only buy this product if you like glitter. Glitter seems to float everywhere, and everything in the house becomes sparkly. My fiance's feet were all sparkly the other day...=)

But the colors of glitter are really pretty and shiny. And they are lots of fun to use. So on a scale of 1-10, I would give this a 6.

What are your thoughts on this product?

♥Autumn

Thursday, April 10, 2008

Dried Bean Pictures

My mom has always been crafty. One of my favorite crafts from when I was little was making dried bean pictures. She would ask us what kind of picture we wanted to make, outline it on paper with glue, and let us press the beans onto the paper. Boys and girls both love this craft.


What you'll need:
♦ White craft glue
♦ dried beans
♦ a pencil or marker
♦ construction paper

Draw a picture on a piece of paper using your pen or pencil. Outline your picture with glue.


Cover the glue with beans and let dry.

The possibilities of what you can make are endless. Abigail made a flower, Collin made a rocket, and I made a turtle and a smiley face. And...


A heart for Stacie!

I would love to see what you make!

♥Autumn

Tuesday, April 8, 2008

A Gift Wrapping Station


If you are like me, then your gift wrapping supplies are always getting in the way. Recently I put my wrapping paper in a rubber-maid box to keep it organized.
And the container had two tray that fit in it to hold ribbons and gift bags! How do you keep your supplies organized?

♥Autumn

Monday, January 7, 2008

Little Boxes


Have you every noticed that when a gift is given in a pretty or clever way, it is much more appreciated? Well, I love giving gifts AND making them pretty, so I was thrilled when Steph showed me how to make these little boxes. They are perfect for giving little gifts!

Several supplies are needed for making this craft:
A card of any size (blank or used, either way is great!)
tape
a ruler
a pencil
scissors
Cut your card in half down the fold in the middle.

Lay your ruler diagonally on the paper. Draw a line against the ruler, in the middle.
Do the same on the other diagonal, so that your marks have made an X. Yes, this step MUST be done. If you skip it, your box will end up very crooked.


Fold every side of your card into the middle of the x, and then unfold it. Every side should be creased now.

Cut the fold on the END of the card down to the fold in the middle. Do this on every side, but be sure to only cut the vertical folds, not the horizontal folds.

Fold the ends that you cut towards each other. Bring the center paper over the overlapped pieces and fold it down over the overlap. Tape in place.
Do the same on the other side.

The bottom of your box is now made. Repeat the whole process with the second half of the card.


The top of the box can be fitted over the bottom. It might be a little snug at first, but it will fit.

These boxes are very versatile. They can be made out of cards, cereal boxes, calendar pages, construction paper, etc. They can be made out of regular printer paper, but they are not very stable.

I hope that my instructions were clear enough, and that you will have fun making them. My 8 year old sister makes them constantly!

♥Autumn

Tuesday, December 18, 2007

Pretty Paper


Do you hate how store bought paper is always perfect? I mean, when you buy polka-dot paper, the dots are always perfectly lined up, and nothing is ever random. If you have wrapping woes, brighten up your gifts with some homemade paper!
Starting with plain white paper, here are a few ideas:

•Use rubber stamps to make a pretty design
•Scribble all over it with different colors (trust me, it actually looks very cool)
•Use a needle to pierce patterns in it
•dip the end of a paper towel tube in paint and print circles all over the paper
•Place stickers all over it
The possibilities are endless. If you are out of white paper, newspaper looks very unique too.

This paper was made with rubber stamps.

You can use these same ideas to make note cards!


Don't contain these ideas to Christmas only. Vary them to make paper and cards all year long!

♥Autumn

Calling All Flakes!....Making Snowflakes

Making paper snowflakes is a great way to bring the winter weather into your home. No matter where you live! I will show you a great way to fold and cut your paper, so that the flakes will look pretty.Start with a square of paper.
Fold the paper in half diagonally.Fold in half again by bringing the top corner down to the bottom corner.
Fold the triangle in thirds, starting by bringing the left corner to the middle, then doing the same with the right corner.
Cut the "wings" off of the bottom of the triangle, so it looks like the above picture.Cut notches, triangles, or any desired shapes into your snowflake. Usually, the more you cut, the prettier the flake is.
And Voila! You have a beautiful paper snowflake. After a few tries, you'll be able to figure out some great patterns for the best snowflakes.
Have fun!

♥Autumn