Showing posts with label crocheting. Show all posts

Saturday, November 27, 2010

Friday, March 5, 2010

Chapstick Holders


I was inspired by these...and so I made up my own pattern to share with you!


Chain 6. Slip stitch together. Single crochet in each stitch around (only 1 time around), increasing in each stitch. Single crochet in each stitch around, without increasing, until holder is as tall as a tube of chapstick. Turn holder around, and crochet 4 stitches back over what you just crocheted. *Chain 1, sc 4 st. across.* Repeat * for 6 rows. Chain 4 and slip stitch to end of row. This is your buttonhole. Secure, and tie off yarn. Sew a coordinating button to the front of your holder so that the buttonhole will fit securely over it. Add a keychain ring to the top side, and you are finished!

These are handy for putting on a key ring, so your chapstick doesn't get lost in the bottom of your purse!

Autumn

Monday, March 1, 2010

A Granny Square Blanket


I just finished this blanket to donate to the local Crisis Pregnancy Center. I used yarn scraps, and was pleased that it worked up so quickly. The pattern is as follows:


Round 1:
Chain 6. Slip stitch into the first chain. Chain 3 and make two double crochets into the center ring. Chain 3. Make 3 double crochets into the center ring. Chain 3 and make 3 double crochets into center ring. Chain 3 and make 3 double crochets into the center ring.

You should have four clusters of three stitches.

You can change colors here, or you can slip stitch into a corner of your granny.

Round 2:
Chain 3 and make 2 double crochets into the corner hole. Chain 3 and make 3 double crochets into the same corner.

Chain 1. Make 3 double crochets into the next corner whole, chain 3, and make 3 double crochets into the same whole. Chain 1, and start working into the next corner. Work the same way in every corner until you get back to the begining of the round.

You can change colors, or slip stitch to a corner.

Round 3: Starting in a corner, Chain three, and make 2 double crochets into the corner. Chain 3 and make 3 double crochets into the same whole. Chain 1 and make 3 double crochets into the side whole. Chain one and work make 3 double crochets in the corner whole. Chain 3 and make three double crochets into the same whole. Chain 1 and make 3 double crochets into the side whole. Chain 1 and work into the corner. Continue working until you are at the end of the round. Slip stitch and end off, or you can keep going to make it bigger.


Continue to repeat this process...crocheting 2 sets of three in each corner, chaining 1, and working 3 double crochets in every open space until you reach the next corner. Make blanket as big as desired. You can leave the edging as a single stitch, crochet a scalloped border the entire way around, or do as I did, and crochet with matching fuzzy yarn in a single stitch the whole way around.


Because this blanket works up so quickly, it is perfect for Project Linus. Experiment with different color combinations. This blanket is lovely no matter how you do it.

Autumn

Wednesday, February 3, 2010

Saturday, December 19, 2009

Scarves


I have been busy crocheting
scarves.

Just in time to sell them for Christmas!


To make my scarves, I simply chain as wide as I want, and single crochet until it is as long as I want. Then, single crochet around the sides of the scarf, and weave in ends!


Merry Christmas!

Autumn

Wednesday, April 15, 2009

For Abigail


Abigail also requested a bookmark. Again, feeling lazy, I grabbed my biggest hook, and made her one using only the single stitch. 

   Using a big hook can really alter the look of a stitch. It also make your project go faster!

♥Autumn

Tuesday, April 14, 2009

Trellis


Collin asked me to make him a bookmark. I was feeling lazy, and I wanted to do something fast and easy. So I made him one using the trellis stitch. Here is how you do it:

Chain a multiple of 4. Single crochet through the first row. Turn. Chain 5. Skip 4 stitches and single chain into the 4th stitch. Chain 5 and skip 4 more stitches, single crocheting into the 4th.
Turn. Chain 5. Single into the loop.

Continue this pattern until it is as big as you want it.

♥Autumn

Monday, April 13, 2009

Changing Colors In Crochet

Kate asked me how to change colors while crocheting...here is my best attempt at explaining it. 


Crochet until you run out of yarn. Stopping at the end of a row is best, if 
possible, but you can also change colors in the middle of a row. 

If you are changing colors at the end of a row, turn your work around, like you would to start a new row.  Trim your yarn off. (about 2-3 inches)


Insert you hook through your next space. Grab your new color of yarn and pull it through. 
Chain 1. In these pictures, I am using a single stitch, but it doesn't matter what stitch you are using. Make your stitch in the same space.


Crochet over your yarn tails, and then weave them in. Continue your project.

Changing in knitting is basically the same. Just grab your new color of yarn, and start working with it.

Hope this helps, Kate!

♥Autumn

Monday, February 23, 2009

Another One

In baby colors....


A baby blanket for my hope chest.


♥Autumn

Saturday, February 21, 2009

Slanted Shell Stitch

Here is the pattern for the slanted shell stitch. It is what I used for Jon's blanket. I don't remember how many chain stitches I used...but it was a lot! I used an H hook, but you can use any size, because gauge isn't really important.
Multiple : 4 + 5 Row 1: 4 DC in 4th CH from HK. *SK 3 CH, SC in next CH. CH 2, 4 DC in SC. Repeat across from *. CH 5, turn. Row 2-end: 4 DC in 4th CH from HK. *SC in-between CH2 and DC of next shell. CH 2, 4 DC in SC. Repeat from * across. Ch 5 Turn.

Tuesday, February 17, 2009

Stripy Blanket


I crocheted this afghan for a Christmas gift. I used red heart acrylic yarn, and it washes really well.


Pattern coming soon!


♥Autumn

Sunday, February 15, 2009

Grannies

Here is the pattern that I use to make granny squares:


Chain 6. Slip stitch into the first chain. Chain 3 and make two double crochets into the center ring. Chain 3. Make 3 double crochets into the center ring. Chain 3 and make 3 double crochets into center ring. Chain 3 and make 3 double crochets into the center ring.

You should have four clusters of three stitches.

You can change colors here, or you can slip stitch into a corner of your granny.

Chain 3 and make 2 double crochets into the corner whole. Chain 3 and make 3 double crochets into the same corner.

Chain 1. Make 3 double crochets into the next corner whole, chain 3, and make 3 double crochets into the same whole. Chain 1, and start working into the next corner. Work the same way in every corner until you get back to the begining of the round.

You can change colors, or slip stitch to a corner.

Starting in a corner, Chain three, and make 2 double crochets into the corner. Chain 3 and make 3 double crochets into the same whole. Chain 1 and make 3 double crochets into the side whole. Chain one and work make 3 double crochets in the corner whole. Chain 3 and make three double crochets into the same whole. Chain 1 and make 3 double crochets into the side whole. Chain 1 and work into the corner. Continue working until you are at the end of the round. Slip stitch and end off, or you can keep going to make it bigger.


Hopefully you all can understand this! I am not very good at writing out patterns....let me know if you try it!


♥Autumn


Saturday, February 14, 2009

Back

Our new computer is here. I'll be uploading pictures soon, and then I'll be full of new posts...including my granny square pattern!

♥Autumn

Wednesday, November 26, 2008

Zig Zag Pattern

This pattern is beautiful. But it takes forever, and I don't think I will ever make another one. It took me two months to make this baby blanket. I have never worked on a project that long. But if you have a lot of time on your hands, and would like to make a beautiful blanket, give this pattern a try!

Zig Zag Stripes:

Gauge isn't critical. use and size hook you are comfortable with. I like to use an H.

To make your foundation, chain a multiple of 13. Yes. Any multiple of 13. I think I used 156, but I can't remember...

Now, add 4 more chain stitches to this.

Begin in the second chain from your hook. single crochet in the second chain, and the next. Skip 1 chain. Single crochet in the next five stitches. *Work 3 single crochets into the next chain, and single crochet in the next 5 stitches.* Repeat from "*" all the way until there are 3 stitches left. Skip one, and single crochet into the next two.

Do this in every row. BUT, instead of working through both loops of a stitch, like normal crochet, only work through the first loop. This makes a really cool rippled effect, but takes FOREVER!

If you give this pattern a try, let me know. I would love to see pictures of your finished projects!

♥Autumn

Wednesday, November 5, 2008

A Blanket for Baby Isaac

I'll be posting the pattern soon!

♥Autumn

Friday, October 3, 2008

Another Crocheted Flower


Here is the pattern for the flower that Stacie recently made. It is a lot easier than the directions for the last flower I posted, and it is adorable.

Chain 6. Slip stitch into first chain. Chain 3.
Make 14 double crochet stitches into the center of the ring.
Slip stitch into your first stitch.

Now you make the petal.

In the next stitch, make 1 half double crochet, 1 double crochet, and 1 triple crochet.
In the next stitch, make 1 triple crochet, 1 double crochet, and 1 half double crochet.
Chain 1. Slip stitch into the next stitch.

Repeat the above steps until you have 5 petals. Slip stitch into the last stitch, finish of your yarn.

If you have any questions, feel free to ask!

♥Autumn

Friday, September 5, 2008

Crocheted Flower

We had a lot of requests for this pattern! I hope that you enjoy it! Tell us if you make any...I'd love to see pictures. This is a different flower than the one that Stacie showed in her post. We'll have directions up for that one soon. This flower and directions were originally posted here.


To begin: Chain 5, join with a sl st to first chain to form a ring

Rnd 1: Chain 2 (counts as 1 sc), work 15 sc into ring, join with slip stitch to beginning ch

Rnd 2: * Chain 4, skip 2 sc, sl st in next sc; repeat from * 4 more times, ending last st in base of beginning chain

Rnd 3: In each ch 4 sp around work ( 1 sc, 4 dc, 1 tr, 4 dc, 1 sc); join with sl st to first sc

Rnd 4: *Chain 5, sl st between next 2 sc (between petals); repeat from * 4 more times, ending with a sl st to base of beginning chain

Rnd 5:In each ch 5 sp, ch 1, work ( 1sc, 5dc, 3tr, 5dc, 1sc) around, ending with a sl st to beginning ch. End yarn, leaving a tail of at least 6 ". Weave tail into flower and cut.

Have fun!


Autumn

Wednesday, August 20, 2008

Crocheted Purses

I finally am posting! Here are photos of the purses I crocheted. I don't really know how to explain it how to do it, because I didn't use instructions. However, there are instructions for the flower on the orange purse. I can post instructions on how to make the flower if you would like. You don't have to follow a pattern for the purses though. That is what is so fun about it is that you can be creative with it. Enjoy the photos. Maybe it will inspire you to make your own. Half double crochet for both the blue and yellow purses. Single crochet for the orange purse. I hand sewed frabic for lining in this purse. It really didn't turn out so well.... But I am keeping it for myself anyhow.
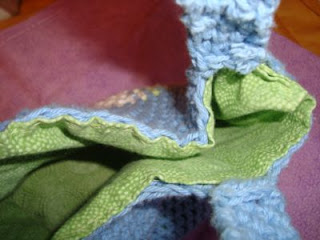
Feel free to ask me any questions you might have about making them. I'll try to answer them best I can. Happy Purse Making!

-Stacie

Friday, August 8, 2008

Kate, This is for You- Making a crocheted rug

I had planned to upload a video to show how to make this. But I couldn't get my video to upload, and I wanted to get this up here. So I'll try to explain this as well as I can, and if anyone has any questions, feel free to ask me.
Making a Crocheted Rug

To make a round rug:

Start by chaining 4 stitches, and slipstitch your 4th chain into the first one.

You will have a circle of stitches. Start to crochet into these stitches, only using a single stitch.

Your rug will start to turn into a bowl, before to long. To prevent this from happening, you will need to increase your stitches. When you make a stitch, make a single stitch into the exact same hole. This will make an increase. You need to make this fairly often when you are first starting. As your rug gets bigger, you can decrease the number of times that you increase.

When your rug is as big as you want it, you can decrease, and weave your extra fabric in. Your done!

To make an oval rug:

Chain a fairly long chain of stitches. If you make it too short, your rug won't look like an oval.
Start to single crochet in every stitch, going around the chain. On the shape, you only need to increase in the corners.

I am really sorry that I wasn't able to get the video uploaded. I'll keep trying to upload it, and will publish it as soon as possible. Until then, I hope that this helps!

Autumn

Monday, August 4, 2008

Coming Soon...

A tutorial on how to make crocheted rugs!
I should have it up in a few days!